How to Cook Brisket on a Gas Grill
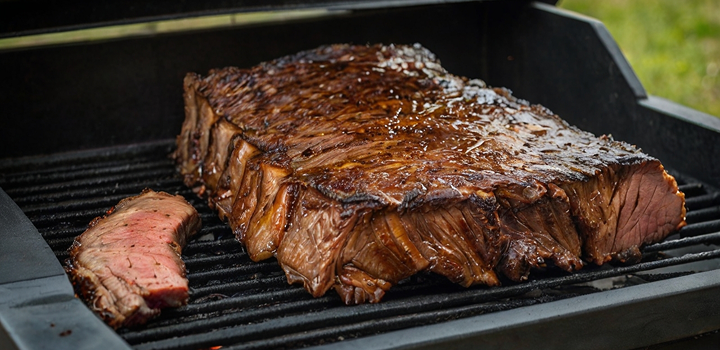
How to Cook Brisket on a Gas Grill: Expert Guide for Beginners

Author: Arianne Nemna
There’s something deeply satisfying about pulling a tender, bark-crusted brisket off the grill after hours of patient cooking. And while traditionalists might reach for a smoker or wood-fired pit, the truth is that a gas grill—yes, your backyard standard—can absolutely deliver brisket that’s rich, juicy, and smoke-kissed when treated right. The secret lies not in fancy tools, but in mastering heat zones, pacing, and preparation.
This guide is designed for anyone looking to make real barbecue brisket using a gas grill. Whether you’re cooking a trimmed flat for a weeknight meal or a full packer for a weekend gathering, I’ll walk you through every step, from choosing the right cut to building indirect heat, adding smoke flavor without a smoker box, and knowing exactly when to pull it off the grates. If you’ve ever wondered whether gas grilling can do a brisket justice—the answer is a confident yes. Let’s get into it.
- What Makes Brisket on a Gas Grill Different
- Choosing and Preparing Your Brisket
- Two-Zone Grill Setup for Indirect Cooking
- Low-and-Slow Cooking Method
- Quick-Finish Sear & Rest
- Common Problems & Smart Fixes
- Adapting for Small or Portable Gas Grills
- Creative Serving and Leftover Ideas
- 15+ FAQs on Gas Grill Brisket
What Makes Brisket on a Gas Grill Different
Cooking brisket on a gas grill is one of those methods that often gets underestimated. While gas doesn’t have the same built-in smoke flavor as charcoal or offset smokers, it offers a level of precision, ease, and control that makes it perfect for beginners aiming to master the craft of low-and-slow barbecue. The key lies in understanding how to turn a basic gas grill into a controlled indirect heat chamber that mimics smoker-like results. With the right setup, you can create bark, render fat properly, and keep the meat moist for hours—without needing expensive gear or constant fire babysitting.
Indirect vs. Direct Heat — Why It Matters
Brisket is a tough cut with a lot of connective tissue. It doesn’t respond well to high, direct heat like a steak would. The transformation from chewy to tender only happens when collagen breaks down slowly over hours at a low, stable temperature. That’s why you’ll need to bypass the typical “grill it fast” approach and instead use a two-zone indirect cooking setup.
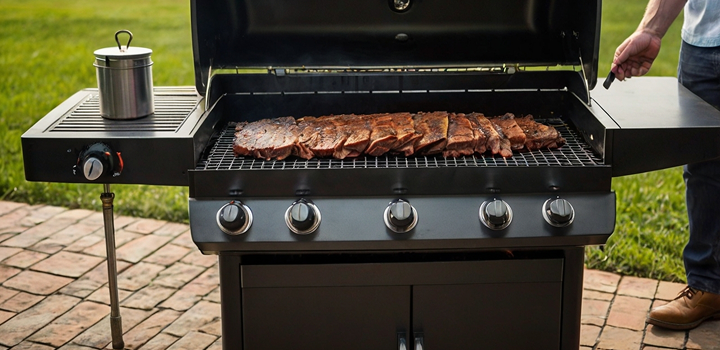
On a standard three-burner gas grill, that means turning on only one side and placing the brisket on the opposite end with the lid down. The indirect zone becomes your low oven space—ideally between 225°F and 250°F. Direct heat can scorch the outside too early while leaving the inside undercooked and stringy. Indirect heat allows smoke, time, and internal fat to do the work evenly.
Smoke Flavor Without a Smoker Box
One of the most common objections to grilling brisket on gas is the lack of smoke. But you don’t need a full smoker box to infuse flavor. A handful of hardwood chips soaked in water for 30 minutes, then wrapped loosely in foil with slits on top, works surprisingly well. Place the foil pack directly over the active burner and close the lid. Once it starts to smoke, the vapors will circulate inside the grill chamber, coating the meat and helping create bark.
You can rotate between hickory, oak, mesquite, or even fruitwoods like apple or cherry depending on the flavor profile you’re going for. Just make sure the grill stays shut during cooking intervals—opening it often lets out heat and smoke and interrupts the slow breakdown process you need.
Choosing and Preparing Your Brisket
Trim and Decide on Fat Cap Thickness
When selecting brisket for a gas grill, you’ll likely be choosing between a whole packer brisket (includes point and flat) or a flat cut only. For most gas grills, a trimmed flat between 5 to 8 pounds fits better and cooks more evenly.
The fat cap—an external layer of fat on one side—needs attention. Leaving it fully intact can block seasoning from penetrating and create runoff that pools in the grill. However, trimming it too close removes insulation that keeps the brisket moist. Aim for a ¼ inch layer across the top, smoothed evenly with a sharp boning knife. Remove hard surface fat and silverskin from the underside for better heat penetration.
Dry Rub vs. Injection — Seasoning for Flavor vs. Moisture
Dry rubs are your first line of flavor. A blend of coarse kosher salt, black pepper, paprika, and garlic powder is a solid base. The key is coating the brisket generously and letting it rest for at least 4 to 12 hours in the fridge before grilling. This resting time allows the salt to pull into the meat and begin light curing, creating deeper flavor and bark potential.
Injections are optional but can help with moisture retention over long cooks. A mix of beef broth, Worcestershire sauce, and melted butter, injected evenly every couple of inches, keeps the interior juicy without affecting the outer bark. If you go this route, inject right before you begin cooking.
Two-Zone Grill Setup for Indirect Cooking
Burner Layout and Temperature Zones
To properly cook brisket on a gas grill, the first thing I do is convert the cooking surface into a two-zone environment. That means creating a hot zone (direct heat) and a cooler zone (indirect heat), even if your grill has only two or three burners.
On a three-burner grill, I keep the left burner on medium-low and the other two completely off. The brisket goes over the unlit burners, never directly above the flame. I close the lid and monitor the air temperature inside the grill hood, aiming for 225°F to 250°F, the classic low-and-slow barbecue range. If your grill runs hot, crack the lid slightly or turn the active burner lower.
Here’s a basic layout breakdown:
| Grill Type | Burners On | Brisket Placement | Target Temp |
| 2-Burner | Left on | Right side | 225–250°F |
| 3-Burner | Left on | Middle or Right | 225–250°F |
| 4-Burner | Outer left or right on | Center opposite side | 225–250°F |
Managing zones this way transforms the gas grill into a reliable indirect cooker—essential for tender brisket.
Wood Chips, Smoke Box, and Water Pan Placement
While your grill might not be a smoker, it can act like one. I wrap ½ cup of soaked wood chips (hickory, oak, or cherry) in aluminum foil, poke some holes in the top, and place the pouch right over the active burner. Once it begins to smoke, I shut the lid and trap the aromatic heat inside.
If you want longer smoke output, use a smoker box with dry chips and refill every hour. Some grillers swear by dry chips for stronger smoke, but soaked chips smolder slower and reduce flare-ups. You can also add a small foil pan filled with water next to the brisket. It helps stabilize humidity, keep the temperature even, and prevents the meat from drying out during long cooks.
Low-and-Slow Cooking Method
Maintain 225–250°F Over Hours
Brisket isn’t a quick cut. I plan for 60 to 75 minutes per pound at a steady 225°F–250°F. For a 6-pound flat, I’m looking at 6 to 7 hours minimum, plus resting time. The collagen inside brisket only begins to break down properly when cooked for hours below boiling point. That’s where the magic happens.
Keep the lid closed as much as possible. Every time you open it, heat and smoke escape, and the cook time stretches out.
When to Wrap (Texas Crutch) and Why
Around the 4 to 5 hour mark, the internal temperature will often stall at 150°F–165°F. This is normal—it’s the point where moisture evaporates from the surface and slows cooking. To push through the stall, I wrap the brisket tightly in heavy-duty foil or butcher paper.
This step, often called the Texas Crutch, helps retain heat and speed up collagen breakdown. It also softens the bark slightly, which some people prefer. I usually wrap when the bark is formed but not charred and finish cooking wrapped until it hits the final target range.
Monitoring Internal Temperature to 195–205°F
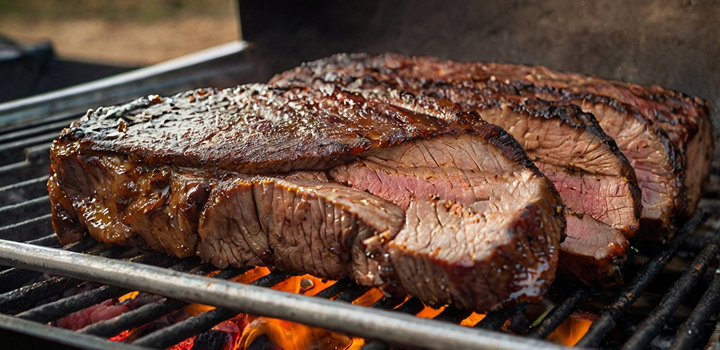
The finish line for brisket isn’t about time—it’s about internal temperature. I always use a probe thermometer, inserted into the thickest part of the flat. The brisket is done when it hits 195°F to 205°F and feels tender like softened butter when probed.
Here’s a quick reference:
| Internal Temp | What’s Happening | Action |
| 150–165°F | Stall phase (evaporation) | Wrap if desired |
| 195–205°F | Collagen broken down, brisket is ready | Remove and rest |
After reaching temp, rest the brisket—wrapped and covered—for at least 30–60 minutes. That’s when the juices redistribute, and the meat becomes silky and sliceable.
Quick-Finish Sear & Rest
High-Heat Crust — When and How to Sear
If you wrapped your brisket during the stall, the bark might soften a bit. To bring back a dark crust, I finish with a high-heat sear right on the grill grates or under a broiler. Once the brisket reaches 195–205°F internal, I unwrap it, crank one burner to high, and sear each side for 1 to 2 minutes. This tightens the exterior and deepens the color without overcooking the inside.
You can also finish under the oven broiler if your gas grill doesn’t get hot enough. Just keep the meat 6 inches below the broiler flame and monitor closely. This step isn’t mandatory, but it makes a big difference in texture and presentation, especially if you want that mahogany crust to shine on a serving platter.
Resting Time, Slice Technique, and Serving Temperature
Resting is non-negotiable. After cooking, I transfer the brisket—still wrapped or loosely tented in foil—to an insulated cooler or a room-temp oven (turned off). Let it rest for at least 45 minutes, ideally up to 1 hour. During this time, the internal temperature evens out and juices redistribute, which keeps every slice moist.
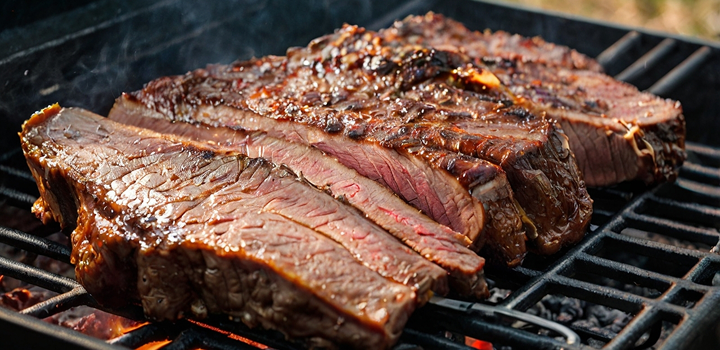
For slicing, I always go against the grain. Look for the muscle fibers and cut perpendicular to them. For the flat, I aim for ¼ to ⅓ inch thick slices. If you cooked a full packer, note that the point grain runs at a different angle, so adjust your slicing halfway through.
Here’s a quick slicing guide:
| Section | Grain Direction | Slice Thickness | Notes |
| Flat | Long, straight muscle fibers | ¼ to ⅓ inch | Leaner, more uniform slices |
| Point | Diagonal, fatty layers | ½ inch | Juicier, looser structure—slice thicker |
Serve brisket warm, ideally at 140°F to 150°F internal—the sweet spot where fat is still soft and flavor is at its peak.
Common Problems & Smart Fixes
Burnt Bark but Raw Center — Heat Control
If the bark looks perfect but the internal temperature is still way below done, your grill is likely running too hot on the bottom or the brisket was placed too close to the heat source. This is especially common with small grills where the brisket can’t sit fully in the indirect zone.
Solution: I reposition the brisket farther from the active burner and lower the flame. If the bark is in danger of burning, I wrap the brisket in foil and continue cooking until it reaches temp. You can also place a small baking sheet or pan under the meat to diffuse heat.
| Symptom | Cause | Fix |
| Bark burnt, inside underdone | Too much direct heat | Move meat, lower flame, wrap |
Dry Meat — How to Boost Moisture
Dry brisket usually means two things: overcooking or undercooking. Ironically, brisket gets drier if pulled too early, because the collagen hasn’t melted yet. It can also dry out from high heat cooking or slicing too soon.
To prevent this, I follow a low-and-slow timeline, wrap during the stall, and let it rest long enough before slicing. For reheating dry slices, I place them in a pan with a splash of beef broth, cover, and warm gently in a 275°F oven.
Moisture chart:
| Mistake | Result | Preventive Tip |
| Cut too early | Juices run out | Rest at least 45–60 min |
| Pulled too early | Tough, dry | Cook to 195–205°F, probe tender |
| Cooked too hot | Dry texture | Maintain 225–250°F over full cook time |
Insufficient Smoke — Increasing Aroma on Gas
If your brisket lacks smoky depth, chances are your smoke source wasn’t producing long enough or the grill was vented too wide. I always recommend changing out the foil chip packet every 60–90 minutes, or better yet, using a dedicated smoker box with refills.
Another trick is using stronger woods like hickory or oak for beef. Fruitwoods are milder and might get lost during long cooks. Keep the lid closed as much as possible—losing smoke means losing flavor.
If you’re already done cooking and still want more smoky aroma, a quick fix is finishing slices with a dash of smoked salt or a light misting of liquid smoke diluted in broth before reheating. It’s not the same as true smoke, but it bridges the gap.
Adapting for Small or Portable Gas Grills
Make Tight Spaces Work — Grate Adjustments
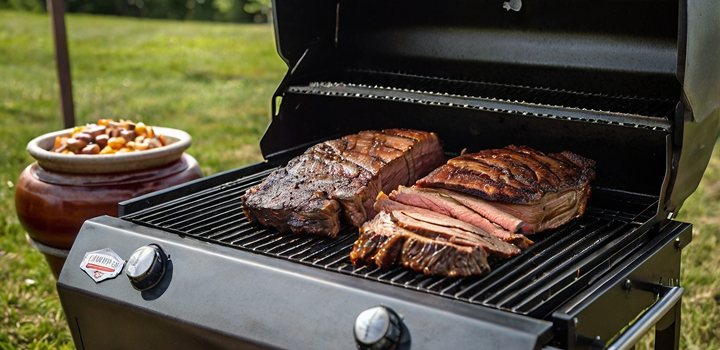
Cooking brisket on a small or portable gas grill is fully doable—you just need to be smart about airflow and positioning. Most compact grills don’t offer much indirect cooking space, so I remove one grate entirely or shift it to create a “raised rack” effect. This lets the brisket sit higher up, away from the direct burner, and allows better circulation of heat.
When the lid won’t close over a full packer brisket, I angle the meat diagonally or trim it down to a smaller flat. Another trick is folding a small section of foil over the edge to protect areas too close to flame jets. It’s not elegant—but it works.
| Problem | Solution |
| Lid won’t shut fully | Angle brisket or remove bone tip |
| Brisket too close to burner | Elevate or shield with foil |
| Uneven heat in tight grill | Rotate brisket every 45–60 minutes |
DIY Smoke Capsule & Extended Fuel Life
To replicate smoker flavor without a built-in box, I make a simple smoke capsule from foil. I wrap a handful of dry wood chips (hickory or oak) in foil, poke 5–6 small holes, and nestle it directly over the burner. When it starts smoking, I drop a second unwrapped batch of wet chips right beside it. This tag-team approach gives initial strong smoke followed by slow smolder.
For longer cooks, fuel conservation matters. I preheat with two burners on, then switch to a one-burner operation to extend fuel life. If I know it’s a 7–8 hour cook, I always keep a spare propane tank ready—or at least check levels before I start.
| Item | Use Case |
| DIY smoke foil pouch | Fast, disposable smoke flavor |
| Dry + wet chip layering | Start strong, finish slow |
| Spare propane on standby | Avoid mid-cook fuel loss |
Creative Serving and Leftover Ideas
Brisket Tacos, Chili, and Sandwich Transformations
One of the best things about brisket is what comes after the main event. I like to plan for leftovers. Sliced brisket makes rich sandwiches with slaw and mustard. Cubed pieces can simmer in chili or baked beans, and shredded brisket turns into taco fillings with lime and cilantro.
For tacos, I reheat slices in a pan with a splash of broth until steamy, then crisp one side under the broiler. For brisket chili, I dice the meat small and use it instead of ground beef. The smoke and spice add deep layers of flavor.
| Dish Type | Reuse Method |
| Sandwiches | Slice thin, reheat gently, serve with sauces |
| Chili | Dice small, simmer in beans/tomato mixture |
| Tacos | Shred or slice, broil, serve with tortillas |
Storing, Slicing, Reheating Without Drying Out
After the meal, I let the brisket cool slightly before slicing all of it. I store slices in their juices in airtight containers or vacuum bags. If I need to keep it more than 3–4 days, I freeze it in flat bags laid horizontal, labeled with weight and date.
When reheating, I avoid microwaving directly. Instead, I place the meat in a covered dish with a tablespoon of beef broth and warm it in a 275°F oven for 15–20 minutes until warmed through but not bubbling. This method revives the texture without toughening.
| Storage Method | Duration | Reheating Tip |
| Fridge (sealed) | Up to 4 days | Oven with broth, covered |
| Freezer (vacuumed) | Up to 3 months | Thaw overnight, then warm low |
| Sliced in juice | Best flavor retention | Keeps meat moist and tender |
15+ FAQs on Gas Grill Brisket
1. Can I cook a full packer brisket on a regular gas grill?
Yes, but you need to use indirect heat properly and possibly angle or trim the brisket to fit. On smaller grills, removing one grate or using an elevated rack helps. Wrapping with foil and rotating the meat also allows for more even cooking.
2. What internal temperature should I aim for?
The ideal range for brisket doneness is 195°F to 205°F, with the higher end giving a softer, pull-apart texture. Always use a meat thermometer inserted into the thickest part of the flat (not touching fat or bone).
3. How do I keep the brisket moist on a gas grill?
Cook low and slow, wrap during the stall, and always rest the meat after cooking. Maintaining a steady 225–250°F grill temp and using a water pan under the meat helps keep the environment moist.
4. What’s the purpose of wrapping the brisket partway through?
This technique, known as the “Texas Crutch,” helps push the meat through the stall—where evaporation slows internal temp rise—while preserving moisture. Wrap tightly in foil or butcher paper around 160°F internal temp.
5. Do I need a smoker box to add wood flavor?
No. You can use a homemade foil packet filled with wood chips. Poke a few holes, place it over a burner, and it will smolder just like a smoker box. Replace every 60–90 minutes for consistent smoke.
6. Should I use wet or dry wood chips on a gas grill?
Dry chips ignite faster and provide an initial hit of smoke. Wet chips burn slower and extend the effect. A mix of both works well—dry for the start, wet for the longer run.
7. How long does it take to cook a brisket on a gas grill?
Depending on size and thickness, it usually takes 8–12 hours. Plan on 1 to 1.25 hours per pound at 225–250°F. A 10 lb brisket will take roughly 10 hours, plus 1 hour resting.
8. Can I cook brisket the day before serving?
Absolutely. Brisket often improves overnight. Let it cool, slice it, store with juices, and reheat gently before serving. This allows flavors to meld and makes day-of entertaining easier.
9. What’s the best cut: flat or point?
The flat is leaner and slices well. The point is fattier, juicier, and more flavorful. A full packer includes both. For sandwiches or tacos, the point offers more richness; for plating, the flat delivers cleaner slices.
10. How do I avoid the bark getting soggy after wrapping?
After unwrapping, you can return the brisket to the grill or broiler for a high-heat blast (1–2 minutes per side) to re-crisp the exterior before resting.
11. Do I need to baste the brisket while it cooks?
Not necessarily. If you’re using a water pan and wrapping, the environment stays moist. However, spritzing with diluted apple cider vinegar or broth every hour can help build bark and add flavor.
12. Why did my brisket turn out tough?
It was either undercooked or not sliced properly. Brisket needs time to break down collagen. If pulled too early, it stays chewy. Also, slicing with the grain instead of against it makes it seem tougher.
13. Can I use a gas grill in cold weather for brisket?
Yes, but it requires more fuel and careful monitoring. Wind guards help. Avoid opening the lid often, as heat loss will extend cook time dramatically.
14. What’s the best way to reheat brisket without drying it out?
Place slices in a covered pan with a splash of broth and warm at 275°F for 20–30 minutes. Avoid microwaving unless using a steam cover or wrap.
15. What sauces pair best with grilled brisket?
Classic options include mustard-based sauces, tangy vinegar blends, or rich pan drippings reduced into a glaze. Brisket also works beautifully with chimichurri or horseradish cream depending on the sides.